This service is for faculty, staff, and students.
After you add your account and sign in to an AppStream 2.0 streaming session, you can do the following in OneDrive:
-
Open and edit files and folders that you store in OneDrive. Other users cannot access your content unless you choose to share it.
-
Upload and download files between your local computer and OneDrive. Any changes that you make to your files and folders in OneDrive during a streaming session are backed up and synchronized automatically. They are available to you when you sign in to your OneDrive account and access OneDrive outside of your streaming session.
-
When you are working in an application, you can access your files and folders that are stored in OneDrive. Choose File, Open from the application interface and browse to the file or folder that you want to open. To save your changes in a file to OneDrive, choose File, Save from the application and browse to the location in OneDrive where you want to save the file.
-
You can also access OneDrive by choosing My Files from the top left of the AppStream 2.0 toolbar.
How to add your OneDrive account to AppStream
To access your OneDrive during AppStream 2.0 streaming sessions, you must first add your OneDrive account to AppStream 2.0.
-
In the top left of the AppStream 2.0 toolbar, choose the My Files icon.
-
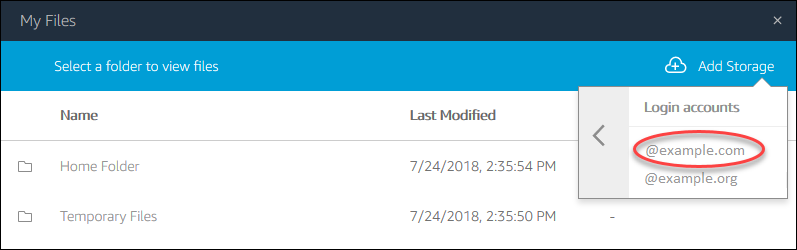
In the My Files dialog box, choose Add Storage.

-
Choose OneDrive.

-
Under Login accounts, choose the @stthomas.edu domain for your OneDrive account.
-
In the Sign in dialog box, enter the user name and password for your account.
-
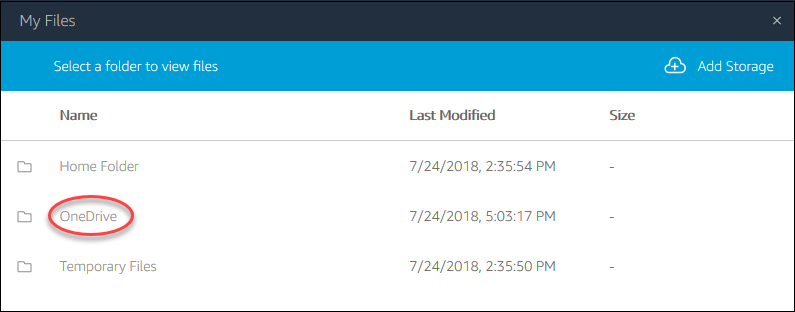
After your OneDrive account is added to AppStream 2.0, your OneDrive folder is displayed in My Files.
-
To work with your files and folders in OneDrive, choose the OneDrive folder and browse to the file or folder you want. If you do not want to work with files in OneDrive during this streaming session, close the My Files dialog box.
How to upload and download files between your local computer and your OneDrive
-
In the top left of the AppStream 2.0 toolbar, choose the My Files icon.
-
In the My Files dialog box, choose OneDrive.
-
Navigate to an existing folder, or choose Add Folder to create a folder.
-
When the folder is displayed, do one of the following:
-
To upload a file to the folder, select the file that you want to upload, and choose Upload.
-
To download a file from the folder, select the file that you want to download, choose the down arrow to the right of the file name, and choose Download.

How to access OneDrive in Windows Explorer using AppStream
After your OneDrive account is added in AppStream you can use Windows Explorer to manage your files.
Note: It may take a few minutes for your files to become available in AppStream. Make sure you've granted App access in your session if your files aren't appearing.
- Choose the Folder icon in your Taskbar then choose on This PC

- Choose OneDrive then Files to view the files and folders stored in your OneDrive.

- Choose Shared if you need to access files or folders that have been shared by another user.
- Double-click on the file you want to open in AppStream.
- Save your files to OneDrive before ending your AppStream session.
How to remove OneDrive permissions from AppStream
If you no longer want to use OneDrive during your AppStream 2.0 streaming sessions, follow these steps to remove OneDrive permissions from AppStream 2.0.
Note: You can restore these permissions at any time during an AppStream 2.0 streaming session.
-
Sign in to Office 365 with your St. Thomas account.
-
In the right pane, under My accounts, choose My account.
-
On the account dashboard page, in App permissions, choose Change app permissions.
-
On the App permissions page, under Amazon AppStream 2.0, choose Revoke.
How to add Microsoft Access files to AppStream from local computer
Warning: "Although you can save an Access database file to OneDrive or a SharePoint document library, we recommend that you avoid opening an Access database from these locations. The file may be downloaded locally for editing and then uploaded again once you save your changes to SharePoint. If more than one person opens the Access database from SharePoint, multiple copies of the database may get created and some unexpected behaviors may occur. This recommendation applies to all types of Access files including a single database, a split database, and the .accdb, .accdc, .accde, and .accdr file formats."
1. In the top left of the AppStream 2.0 toolbar, choose the My Files icon.

2. In the My Files dialog box, choose Temporary Files.
Note: All files stored in the Temporary Files folder will be deleted when you close the AppStream session. Be sure to upload your changed files before closing your session.

3. Navigate to an existing folder, or choose Add Folder to create a folder.
4. When the folder is displayed, choose Upload Files, and select the files that you want to upload.
5. You should now be able to navigate and open the Microsoft Access Folder that you uploaded within the Microsoft Access Application.
Note: Make sure to upload your changed files before closing your session.
To report a problem or receive additional troubleshooting, please contact the
Tech Desk.